TIL
JPA - 일정 CRUD
haseung22
2024. 10. 13. 19:34
저번 과제는 JDBC를 이용한 일정관리 앱을 만드는거였는데 이번 과제는 JPA를 이용하여
일정관리 API를 만드는 것이다. 이번에는 한 단계 한 단계 차근차근 나가보려고한다.
일단 1단계인 일정 CRUD의 요구사항은 아래와 같다.
- 키워드
- @Entity: 데이터베이스 테이블과 매핑되는 클래스에 사용합니다.
- @Id: 해당 필드를 기본 키로 지정합니다.
- @GeneratedValue: 기본 키 생성 전략을 설정합니다.
- @Repository: DAO(Data Access Object) 클래스에 사용하여 데이터 접근을 명시합니다.
- 어노테이션
- 일정을 저장, 조회, 수정, 삭제할 수 있습니다.
- 일정은 아래 필드를 가집니다.
- 작성 유저명, 할일 제목, 할일 내용, 작성일, 수정일 필드
- 삭제의 경우
- 일정을 삭제할 때 일정의 댓글도 함께 삭제
- 이 때, JPA의 영속성 전이 기능을 활용
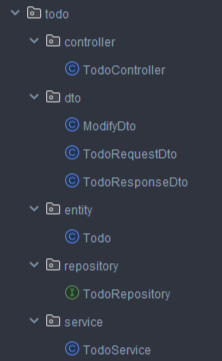
Todo (일정)패키지의 구조는 아래처럼 만들었다.
TodoController
@Valid는RequestDto에 들어오는 객체들을 검증하기 위하여 붙여주었다.
@RestController
@RequestMapping("/api/todo")
@RequiredArgsConstructor
public class TodoController {
    private final TodoService service;

    @GetMapping()
    public ResponseEntity<List<TodoResponseDto>> todoFindAll(){
        List<TodoResponseDto> todo = service.todoFindAll();
        return ResponseEntity.ok(todo);
    }

    @GetMapping("/{id}")
    public ResponseEntity<TodoResponseDto> todoFindById(@PathVariable("id") Long id){
        Todo todo = service.todoOne(id);
        return ResponseEntity.ok(new TodoResponseDto(todo));
    }

    @PostMapping()
    public ResponseEntity<TodoResponseDto> todoCreate(@RequestBody @Valid TodoRequestDto reqDto){
        TodoResponseDto createTodo = service.todoCreate(reqDto);
        return ResponseEntity.status(HttpStatus.CREATED).body(createTodo);
    }

    @PutMapping("/{id}")
    public ResponseEntity<Objects> todoModify(@PathVariable("id")Long id, @RequestBody ModifyDto modifyDto){
        service.todoModify(id,modifyDto);
        return ResponseEntity.status(HttpStatus.OK).build();
    }

    @DeleteMapping("/{id}")
    public void todoDelete(@PathVariable("id") Long id){
        service.todoDelete(id);
    }
}
DTO
@Getter
public class ModifyDto {
    private String title;
    private String userName;
    private String content;
}

@Getter
public class TodoRequestDto {
    @NotBlank
    private String title;
    @NotBlank
    private String userName;
    @NotBlank
    private String content;
}

@Getter
public class TodoResponseDto {
    private final Long id;
    private final String title;
    private final String userName;
    private final String content;
    private final LocalDateTime createdAt;
    private final LocalDateTime modifiedAt;

    public TodoResponseDto(Todo todo){
        this.id = todo.getId();
        this.title = todo.getTitle();
        this.userName = todo.getUserName();
        this.content = todo.getContent();
        this.createdAt = todo.getCreatedAt();
        this.modifiedAt = todo.getModifiedAt();
    }
}
Todo
댓글과 1:N 관계를 형성하기 위하여 미리 OneToMany 어노테이션을 이용하였다.
@Entity
@Table(name = "todo")
@NoArgsConstructor(access = AccessLevel.PROTECTED)
@Getter
public class Todo extends AuditingDate {
    @Id
    @GeneratedValue(strategy = GenerationType.IDENTITY)
    private Long id;

    @Column(nullable = false)
    private String title;

    @Colum(nullable = false)
    private String userName;

    @Column(nullable = false)
    private String content;

    @OneToMany(mappedBy = "todo", cascade = {CascadeType.PERSIST,CascadeType.REMOVE})
    private List <Comment> commentList = new ArrayList<>();

    public static Todo from(String title, String content, String userName) {
       Todo todo = new Todo();
       todo.init(title,content, userName);
       return todo;
    }

    private void init(String title, String content, String userName){
        this.title = title;
        this.userName = userName;
        this.content = content;
    }

    public void modify(String title, String content, String userName) {
        this.title = title;
        this.userName = userName;
        this.content = content;
    }
}
TodoService
@Service
@RequiredArgsConstructor
public class TodoService{

    private final TodoRepository todoRepository;

    public List<TodoResponseDto> todoFindAll() {
        return todoRepository.findAll().stream().map(TodoResponseDto :: new).toList();
    }

    @Transactional
    public TodoResponseDto todoCreate(TodoRequestDto reqDto) {
        Todo todo = Todo.from(reqDto.getTitle(),reqDto.getContent());

        return new TodoResponseDto(todoRepository.save(todo));
    }

    @Transactional
    public void todoModify(Long id, ModifyDto modifyDto) {
        Todo findTodo = isValidId(id);
        findTodo.modify(modifyDto.getTitle(),modifyDto.getContent());
    }

    @Transactional
    public void todoDelete(Long id) {
        isValidId(id);
        todoRepository.deleteById(id);
    }

    public Todo todoOne(Long id) {
        return isValidId(id);
    }

    private Todo isValidId(Long id) {
       return todoRepository.findById(id).orElseThrow(()-> new IllegalArgumentException("존재하지 않는 Todo 번호"));
    }
}
이렇게 1단계인 일정 CRUD를 해봤는데 과제를 하기 위해 JPA 강의 한번 스윽 보고 한거라 개념적으로 많이
부족하다는것을 느꼈다. 이번에는 기본생성자의 access 레벨을 Private이 아닌 Protected로 하였는데
@NoArgsConstructor에서 private 접근 제어자를 사용하면 JPA가 제대로 작동하지 않을 수 있다는 이슈가 있다.
그렇기에 JPA에서는 Public 또는 Protected 접근 제어자를 가져야하는데 캡슐화와 객체의 올바를 사용을 위해
Public 사용보다는 Protected 사용을 지향하는게 좋을 것 같아서 Protected로 하였다.
아직 주어진 과제의 내용이 많지만 차근차근 다 해보려고한다. (목요일까지 되겠지...?)
또한 그냥 대충 쓸줄 안다고해서 그냥 넘어가버리면 안될 것 같다. 오래오래 기억하도록 복습 또 복습을 해야겠다